These materials must not be shared outside of registered Delta Sound Labs EDU cohort.
Cleveland Ableton User Group on Facebook
Week 1: Introduction to MIDI
Week 2: Introduction to Audio
Week 3: Audio Continued + Introduction to Sound Synthesis
Week 4: Introduction to Push
Week 5: Introduction to Audio Editing and Mixing
Week 6: Introduction to Max for Live
YouTube Playlist (Summer 2019)
Example Live Sets
Vocabulary Reference
Week 1: Introduction to MIDI

- Live UI basics: session view, arrangement, + basic navigation.
- Push basics: layout and basic control.
- Useful music theory + production vocabulary .
- MIDI basics, what is it? How can we use it?
- Swapping instruments, tempo, velocity, pitch, duration.
MIDI Sequencing
-
- Programming beats.
- Playing/recording MIDI live.
- Quantization, grid size, velocity.
Sequence a Simple Beat + Vary Velocity / Dynamics
-
- Add a drum rack / preset kit to a MIDI track.
- Sequence a 1 bar drum pattern using the pencil tool (press b on your computer keyboard)..
- Adjust the velocity of some of the snare hits.
- Create copies of your finished sequence (hold alt on your computer keyboard and click and drag to a new clip slot on macOS; CTRL + C/V works, too).

- Use the clip manipulation functions to create patterns variations (Rev + Inv).
- Download Example Live Set
- Session to Arrangement View
Week 2: Introduction to Audio
- Audio set-up basics.
- Using an audio interface and microphone.
- Audio recording and editing basics.
- Recording an acoustic source.
- Input gain/trim on the audio interface.
- Discuss microphone ergonomics/etiquette.
- Recording an acoustic source.
Printing and Resampling

-
- Take your sequenced drum patterns from Week 1
- Using follow actions to mash up your audio samples
- Record from Session to Arrangement view

- Using freeze and flatten to go from sequenced MIDI data to audio data.
- Set global record on the main transport.

Slicing Audio to Use with Drum Rack
-
- Record an audio sample.

- Set transient or warp markers against desirable peaks/attacks/transients.

- Right-click on the adjusted audio sample and slice to new MIDI track.

- Slice relative to transients or use a musical subdivision (e.g., 1/8).
- Try sequencing a new beat sequence using your newly sliced audio in a new MIDI clip in Arrangement or Session view.
- Download Example Live Set
Editing Audio to Use With Simpler
- Record or use an existing audio sample.

- Use CMD/CTL + E to slice the audio sample.

- Use appropriate fades to tighten up the audio sample. Simply hover at the edges of a waveform in Arrangement view to reveal the fader points.

- Use CMD/CTRL + J to consolidate the audio file.

- Drag and drop the audio sample onto Simpler on a MIDI track.

- Shift-click on a blank area in Arrangement View to create a MIDI clip.

- Compose a short, 12-bar pitch sequence using Simpler. Note the chord progressions spelled out in the locators in the demo set. Each colored clip has been consolidated.
- Download Example Live Set
- Warping: Beat-Match Audio Using Elastic Audio
- Record your own audio sample or use the provided audio sample.
- Set your BPM to 100 beats per minute; change your signature from 4/4 to 6/8.

- Manually, set and adjust your transient/warp markers to match the phrasing of the audio sample to your chosen BPM and time signature.
- Download Example Live Set
Week 3: Audio Continued + Introduction to Synthesis

Introducing Splice and Gamelan Audio Samples
- Sync set successfully using Splice.
- Warp 1-2 bar percussion loop/part at 100 BPM.

- You might take a short loop of the Kendang, for example.

- Try selecting ‘Beats’ and set transients to 1.8 notes to tighten up the groove.

- I have the groove emphasizing the up-beat in the finished set which allows space for a programmed beat, if desired.

- Align a complimentary 1-2 bar vocal loop. You can take broaden strokes with the vocal, i.e., cut longer sections and use simple fades to tighten up the audio stem.
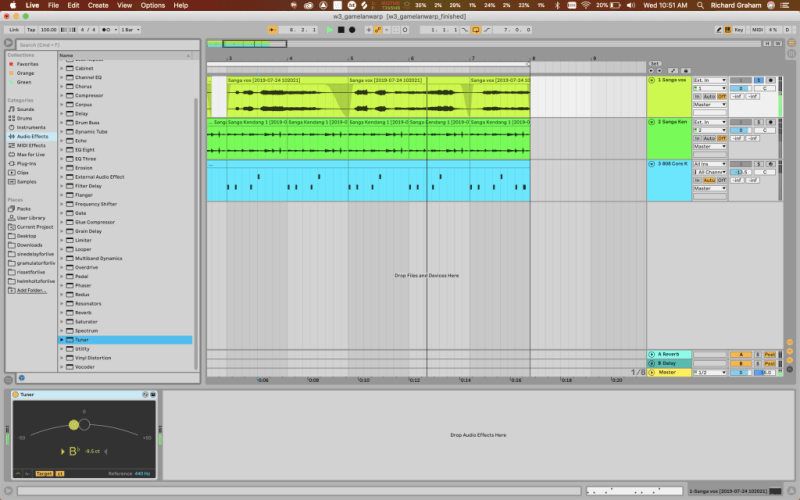
- Use the Tuner audio effect to identify notes of vocal and/or use Audio to MIDI to generate a harmonic basis from which to work.

- Compose a simple bass line or chord progression to compliment the vocal. Try adding the Echo audio effect to create more cohesion in your mix between the different tracks.
- Download the Finished Live Set from Splice
Operator Overview

- Waveform types: Sine, Square, Triangle, Noise

- ADSR: Attack Decay Sustain Release

- Amplitude Versus Pitch Envelope

- LFO: Low Frequency Oscillator

- Max for Live Device: Mappable LFO
Using Operator
-
- Create 2 contrasting voices/waveforms w/ unique harmonic structure
- Apply a pitch envelope to Voice 1 and an amplitude envelope to Voice 2
- Apply an LFO to control the filter cut-off frequency
- Try applying MIDI effects to alter incoming note length and to apply arpeggiation
- Download Example Live Set
- Apply spread to melodic voices to give stereo width in mix
- Apply longer decay envelope to second melody oscillator
- Download Example Live Set
Wavetable Overview

Wavetable synthesis is a technique that uses sampled waveforms and parsed into a sequence of circular tables of samples or wavetables, each having one period or cycle per table. These can range from basic waveforms (e.g., sine, triangle, square, etc.) to harmonically complex, user-based waveforms.
Wavetable in Live permits the ability to modulate or crossfade between waveforms. Its mapping matrix also provides the ability to create powerful performance patches with the Push 2.

- Select a harmonically complex wavetable
- Or load your own wavetable using any audio sample!*
- *Live 10.1 required.
- Or load your own wavetable using any audio sample!*
- Create your own patch using MIDI matrix
- Push 2 Shortcuts
- Shift and tap the Touchstrip to alter the Touchstrip Mode:
- 1) Pitch Bend
- 2) Mod Wheel
- Try assigning Velocity, Aftertouch, Modulation Wheel or Pitch Bend data to control Filter Cutoff
- Apply Envelope 1 to the Oscillator Position in the Wavetable
- Set Envelope 1 to Loop
- Shift and tap the Touchstrip to alter the Touchstrip Mode:
Week 4: Introduction to Push
Layouts: Drums
-
- 64 Pads
- Loop Selector
- 16 Velocities
Drums Exercises
Use the Accent button to sequence accented snare steps
-
- Use the 16 pad velocity mode to sequence “ghosted” lower velocity snare hits before and after the accented snare hits.
- Use the Repeat button, hold a pad and record different repeated note values
- Turn on record quantize so your live performance of hi-hat steps quantize to 1/8th notes

Layouts: Melodies
-
- 64 Notes
- Sequencer
- Sequencer + 32 Notes
Creating Melodies: Exercise
-
- Create a New Track and load a mallet preset sound from Wavetable
- Live record a monophonic melody using the 64 note pad.
- Step sequence at least 3 instances of harmony in addition to the previous melody
- Through push access the Wavetable matrix and map LFO1 to Filter1 cutoff frequency
- Change the LFO1 wave shape and rate while holding a pad to hear the effect.
- Through Push2, Choose “Add Device” to add a reverb from audio effects to your wavetable track.
- Adjust the reverb Dry/Wet using Push
- Create a New Track and load a mallet preset sound from Wavetable
Final Exercises
-
- Create 24 Bars of Original Music Using Push
- Add at least 4 Tracks
- Drums, Pad, Bass, and lead/melody
- Add at least 4 Tracks
- Create 24 Bars of Original Music Using Push
- Use the capture button to retrieve recently performed MIDI sequence.
Week 5: Introduction to Audio Editing and Mixing
Grouping and Organizing

-
- Group related tracks using CMD/CTRL+G
- Group tracks based on the following categories:
- Drums
- Vocals
- Guitar
- Synths
Gain Staging and Setting Levels
-
- Check the overall output levels of each track from your mixer in Session view.
- Soloing parts and listening critically to each stem.
- Can you hear each track clearly?
- Does each part sound balanced relative to others?
- Which instruments or samples are competing for similar frequency ranges?
- How might we address this problem using EQ and/or Compression?
Mixing Drums
- Try lowering the volume of the “OH close” and “OH far” tracks.
- Notice how the room reverb is attenuated and the result sounds drier without the OH far microphone stems in the mix.

- Add the audio effect EQ Eight on the kick drum and eliminate high frequencies using a low-pass filter type.
- Put another instance of EQ Eight on the snare drum and prevent frequencies below 100Hz using a high-pass filter.
- Notice how this creates more space for the snare to be heard more clearly in the mix.
Mixing Synths
-
- Listen to “Synth saw l and h” individually and then with the rest of the mix.
- Which sounds better? Why?
- Listen to “Synth saw l and h” individually and then with the rest of the mix.

-
-
- Use the Spectrum audio effect on both the “bass guitar” and “synth bass” are these tracks competing for a similar range of frequencies? If so, use an EQ audio effect to make necessary adjustments.
-
Mixing Guitars
- Compare the arpeggiated guitar in Bar 37 to the part is Bar 61. Which one sounds better? Why? One part is an octave higher than the other.
- At Bar 25, Apply different effects (reverb, distortion, echo, filters, etc) to each of the guitar low, mid, and high, parts to change the timbre of each. Use audio effect “Spectrum.” again to see which frequencies are most present as you add effects.
Mixing Vocals
-
- During Verse 1, do something to help separate the vocal parts from the plucked guitar part.
- Use Spectrum to see if they are competing for similar frequencies.

- Try panning the vocals left and the guitar right. This will demonstrate how panning can provide space for audio stems. This is not a desirable, final configuration, however!
- Use an EQ to make subtle adjustments to the frequency spectrum of each so they are not competing as much.
Additional Tasks
- During the drum break, put a long reverb tail on the snare and use the automation lanes in Arrangement View to turn on the reverb device only during the drum break.

- Look at “Vocal Comp 1 and 2”.
- Turn on automation and note the volume adjustments.
- Listen to each track in solo and listen to the difference.
- Apply a Compressor to each.


-
- Adjust threshold, attack time, release time, and ratio as we discussed in class.
- Notice how it is smoother after doing some manual volume automation.
- Arm the “high synth” track and improvise some sparse high frequency pitches during Chorus 2. Reference Chorus 1 for style.
- Notice how it stands out from being the only voice in the higher frequencies.
- Use Spectrum to identify the frequency range.
Week 6: Synthesis Continued and Introduction to Max for Live
Max Hygiene 101 – Make a Basic Patch + Include it in a M4L Device
- Create a new Max for Live device using the M4L software instrument template.

- Open your patcher by clicking on the left-most Max icon in the top-right hand corner.

- Unlock your patcher by clicking on the lock icon in the bottom left-hand corner.

- Comment your patches as you go (c) – keep your house tidy.
- Create an oscillator [cycle~ 440] (n).
- Create a UI element slider (s).
- Create an [mtof] object (n).

- Connect the slider to [mtof] and the output of [mtof] to the [cycle~] object.
- Connect the [cycle~] object output to a [plugout~ 1 2] object.
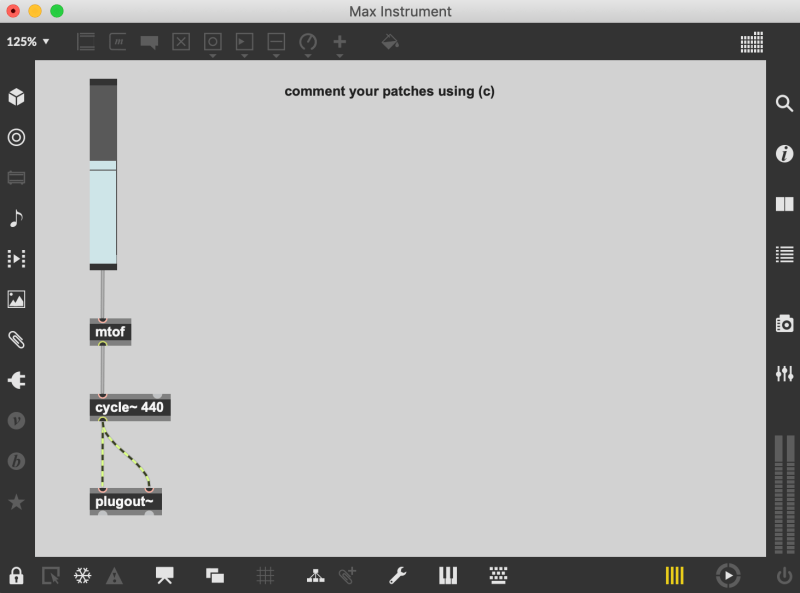
- Edit your patch to include a [live.gain~] object and add it to presentation mode.

- Add your slider to presentation mode by right-clicking on it and selecting “Add to Presentation.”
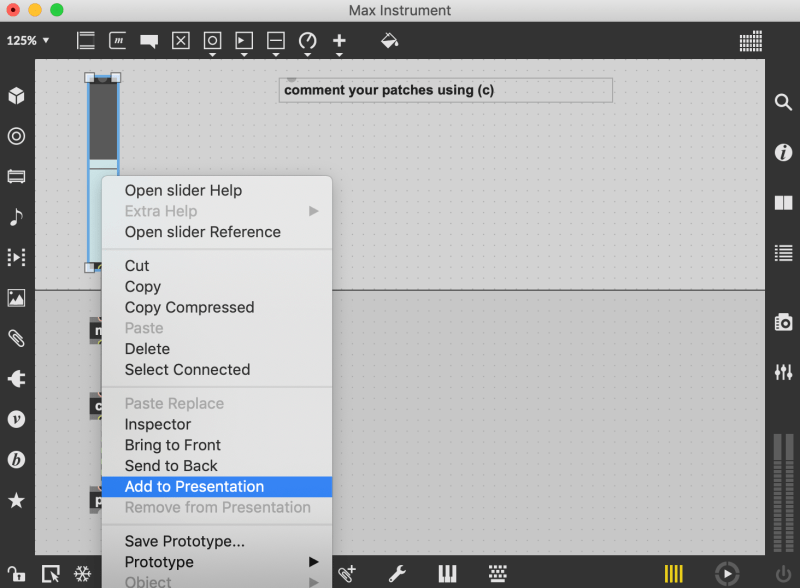
- Make sure you configure your device to open in presentation mode by checking the Open In Presentation mode box in the patcher inspector window.

Modulation Synthesis
-
- What is it?
- Modulation synthesis form of synthesis that seeks to change a characteristic of a waveform by modulating its state using another audio signal.
- The most common forms of modulation synthesis are AM (Amplitude Modulation), RM (Ring Modulation), and FM (Frequency Modulation).
- What is it?
Build an LFO Stage

- We can build an LFO stage to our device by adding a second [cycle~] object.
- An LFO or low-frequency oscillator operates sub 20Hz, usually in a range of 1 to 10Hz.
- You can use [scope~] to display the LFO, if you like!
Ring Modulation + Audio Input as Source

-
- Copy the patch innards (CMD/CTRL + C).
- Create a new M4L audio effect from the template menu in the Live Browser.
- Replace [cycle~] with [plugin~].
- Remove slider and [mtof] objects (no longer required).
- Multiply [*~] your audio input from Live with your second [cycle~] object to create a basic ring modulator audio effect.
Build a Stereo Delay Audio Effect
- Use CMD/CTRL + N to create a new object.

- Use [tapin~] and [tapout~] to establish a basic delay line.
- Use [plugin~] for your audio input and [plugout~] for your audio output.
- Use [line~] to create a ‘tape warble’ effect.
- line is a linear ramp generator; put another way: it allows the smoothing of numbers of a designated period of time.

- Set your slider range using the attribute window (0 – 1000; float).

- Create direct connections for a dry, thru-put signal.

Make it a Dub Delay
- We can create a recursive feedback loop with a filter in Max to create a dub-delay effect.

- We’ll use [svf~] to take a copy of our delayed signal. We will then produce a filtered output of that signal and reintroduce it into the same delay line.
- We need to be careful not to exceed this signal in amplitude beyond 50% in order to avoid deafening feedback.